
目录
- 前言
- 一、YOLOV5的强大之处
- 二、YOLOV5部署多路摄像头的web应用
- 1.多路摄像头读取
- 2.模型封装
- 3.Flask后端处理
- 4.前端展示
- 总结
前言
YOLOV5模型从发布到现在都是炙手可热的目标检测模型,被广泛运用于各大场景之中。因此,我们不光要知道如何进行yolov5模型的训练,而且还要知道怎么进行部署应用。在本篇博客中,我将利用yolov5模型简单的实现从摄像头端到web端的部署应用demo,为读者提供一些部署思路。
一、YOLOV5的强大之处
你与目标检测高手之差一个YOLOV5模型。YOLOV5可以说是现目前几乎将所有目标检测tricks运用于一身的模型了。在它身上能找到很多目前主流的数据增强、模型训练、模型后处理的方法,下面我们就简单总结一下yolov5所使用到的方法:
yolov5增加的功能:
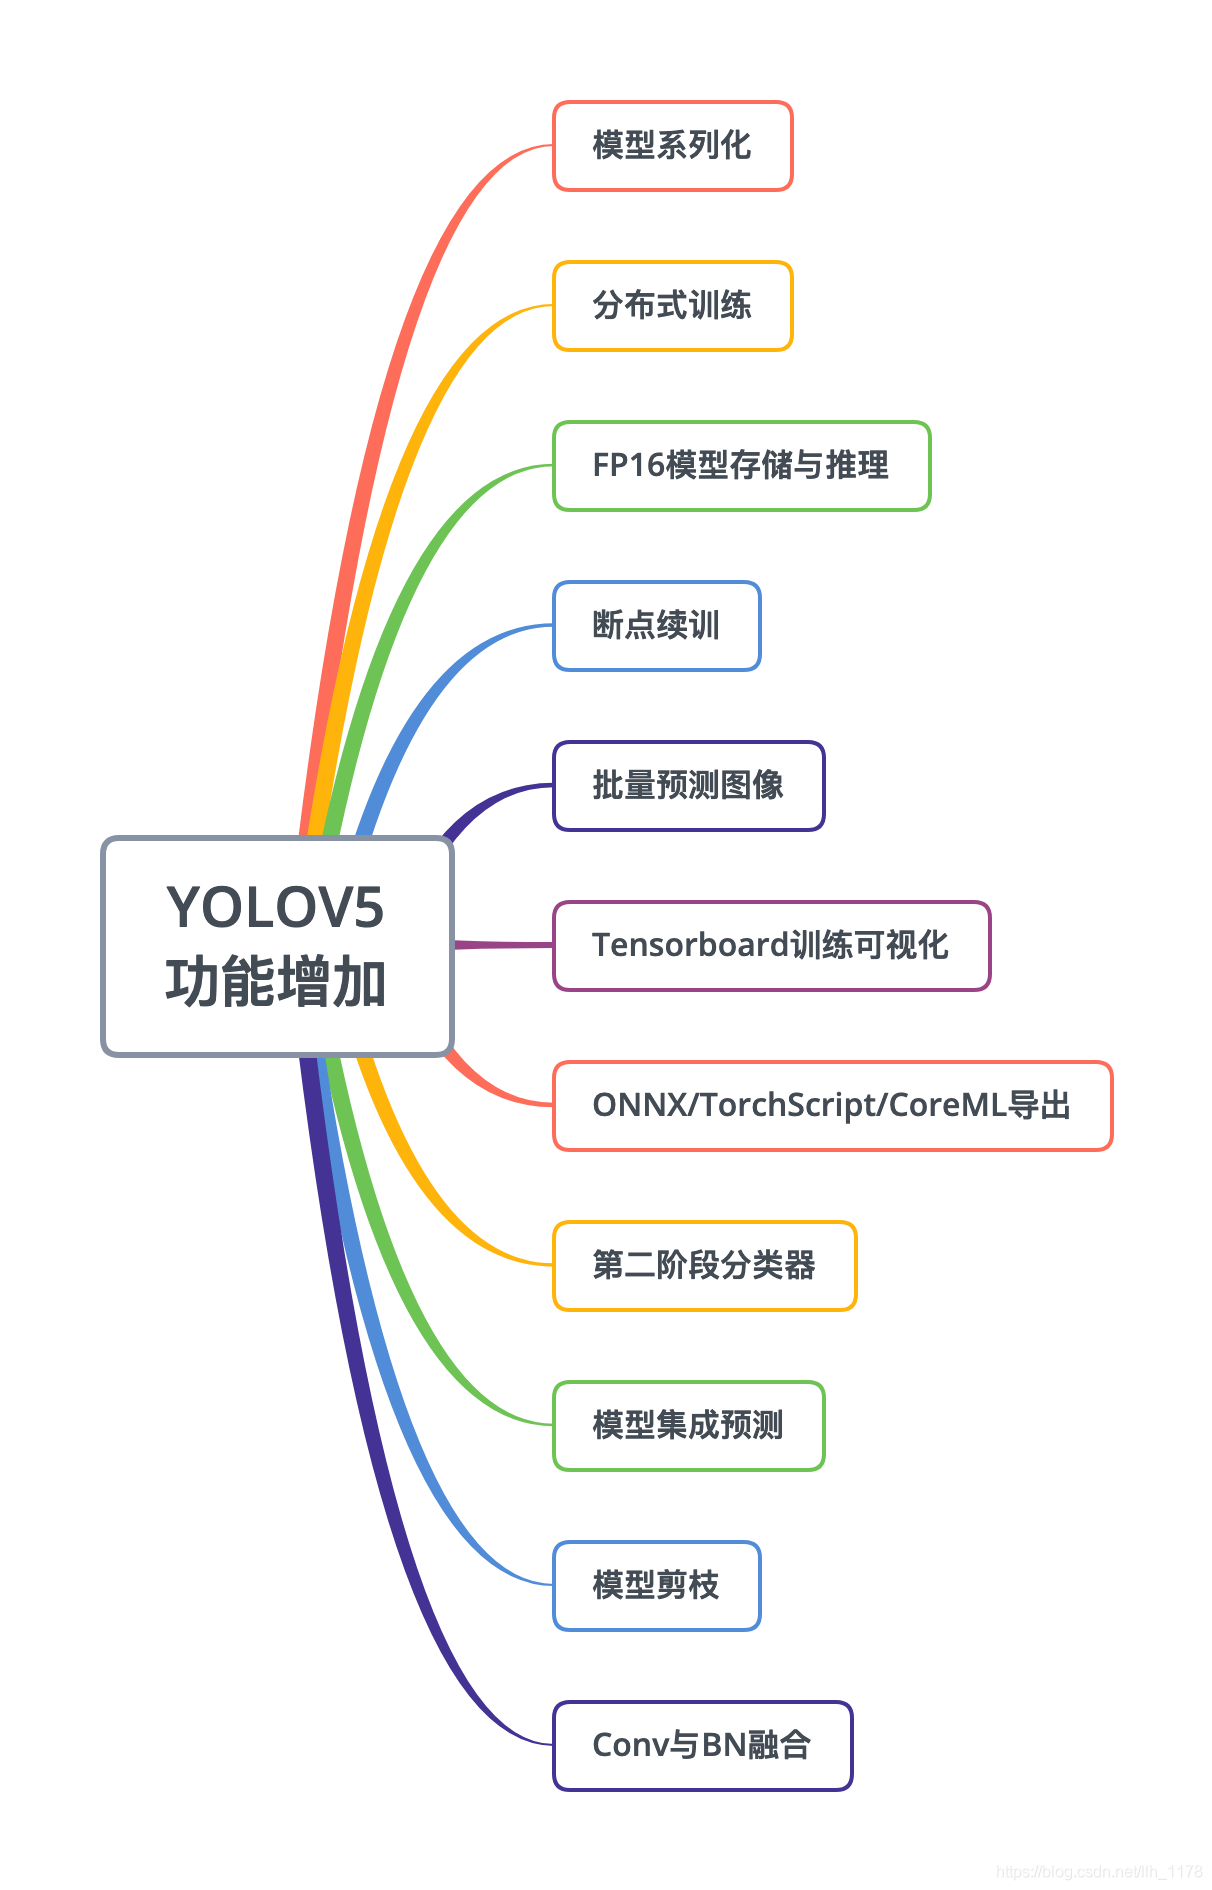
yolov5训练和预测的tricks:

二、YOLOV5部署多路摄像头的web应用
1.多路摄像头读取
在此篇博客中,采用了yolov5源码的datasets.py代码中的LoadStreams类进行多路摄像头视频流的读取。因为,我们只会用到datasets.py中视频流读取的部分代码,所以,将其提取出来,新建一个camera.py文件,下面则是camera.py文件的代码部分:
- # coding:utf-8
- import os
- import cv2
- import glob
- import time
- import numpy as np
- from pathlib import Path
- from utils.datasets import letterbox
- from threading import Thread
- from utils.general import clean_str
- img_formats = [‘bmp’, ‘jpg’, ‘jpeg’, ‘png’, ‘tif’, ‘tiff’, ‘dng’, ‘webp’] # acceptable image suffixes
- vid_formats = [‘mov’, ‘avi’, ‘mp4’, ‘mpg’, ‘mpeg’, ‘m4v’, ‘wmv’, ‘mkv’] # acceptable video suffixes
- class LoadImages: # for inference
- def __init__(self, path, img_size=640, stride=32):
- p = str(Path(path).absolute()) # os-agnostic absolute path
- if ‘*’ in p:
- files = sorted(glob.glob(p, recursive=True)) # glob
- elif os.path.isdir(p):
- files = sorted(glob.glob(os.path.join(p, ‘*.*’))) # dir
- elif os.path.isfile(p):
- files = [p] # files
- else:
- raise Exception(f‘ERROR: {p} does not exist’)
- images = [x for x in files if x.split(‘.’)[-1].lower() in img_formats]
- videos = [x for x in files if x.split(‘.’)[-1].lower() in vid_formats]
- ni, nv = len(images), len(videos)
- self.img_size = img_size
- self.stride = stride
- self.files = images + videos
- self.nf = ni + nv # number of files
- self.video_flag = [False] * ni + [True] * nv
- self.mode = ‘image’
- if any(videos):
- self.new_video(videos[0]) # new video
- else:
- self.cap = None
- assert self.nf > 0, f‘No images or videos found in {p}. ‘ \
- f‘Supported formats are:\nimages: {img_formats}\nvideos: {vid_formats}’
- def __iter__(self):
- self.count = 0
- return self
- def __next__(self):
- if self.count == self.nf:
- raise StopIteration
- path = self.files[self.count]
- if self.video_flag[self.count]:
- # Read video
- self.mode = ‘video’
- ret_val, img0 = self.cap.read()
- if not ret_val:
- self.count += 1
- self.cap.release()
- if self.count == self.nf: # last video
- raise StopIteration
- else:
- path = self.files[self.count]
- self.new_video(path)
- ret_val, img0 = self.cap.read()
- self.frame += 1
- print(f‘video {self.count + 1}/{self.nf} ({self.frame}/{self.nframes}) {path}: ‘, end=”)
- else:
- # Read image
- self.count += 1
- img0 = cv2.imread(path) # BGR
- assert img0 is not None, ‘Image Not Found ‘ + path
- print(f‘image {self.count}/{self.nf} {path}: ‘, end=”)
- # Padded resize
- img = letterbox(img0, self.img_size, stride=self.stride)[0]
- # Convert
- img = img[:, :, ::-1].transpose(2, 0, 1) # BGR to RGB, to 3x416x416
- img = np.ascontiguousarray(img)
- return path, img, img0, self.cap
- def new_video(self, path):
- self.frame = 0
- self.cap = cv2.VideoCapture(path)
- self.nframes = int(self.cap.get(cv2.CAP_PROP_FRAME_COUNT))
- def __len__(self):
- return self.nf # number of files
- class LoadWebcam: # for inference
- def __init__(self, pipe=‘0’, img_size=640, stride=32):
- self.img_size = img_size
- self.stride = stride
- if pipe.isnumeric():
- pipe = eval(pipe) # local camera
- # pipe = ‘rtsp://192.168.1.64/1’ # IP camera
- # pipe = ‘rtsp://username:password@192.168.1.64/1’ # IP camera with login
- # pipe = ‘http://wmccpinetop.axiscam.net/mjpg/video.mjpg’ # IP golf camera
- self.pipe = pipe
- self.cap = cv2.VideoCapture(pipe) # video capture object
- self.cap.set(cv2.CAP_PROP_BUFFERSIZE, 3) # set buffer size
- def __iter__(self):
- self.count = –1
- return self
- def __next__(self):
- self.count += 1
- if cv2.waitKey(1) == ord(‘q’): # q to quit
- self.cap.release()
- cv2.destroyAllWindows()
- raise StopIteration
- # Read frame
- if self.pipe == 0: # local camera
- ret_val, img0 = self.cap.read()
- img0 = cv2.flip(img0, 1) # flip left-right
- else: # IP camera
- n = 0
- while True:
- n += 1
- self.cap.grab()
- if n % 30 == 0: # skip frames
- ret_val, img0 = self.cap.retrieve()
- if ret_val:
- break
- assert ret_val, f‘Camera Error {self.pipe}’
- img_path = ‘webcam.jpg’
- print(f‘webcam {self.count}: ‘, end=”)
- # Padded resize
- img = letterbox(img0, self.img_size, stride=self.stride)[0]
- # Convert
- img = img[:, :, ::-1].transpose(2, 0, 1) # BGR to RGB, to 3x416x416
- img = np.ascontiguousarray(img)
- return img_path, img, img0, None
- def __len__(self):
- return 0
- class LoadStreams: # multiple IP or RTSP cameras
- def __init__(self, sources=‘streams.txt’, img_size=640, stride=32):
- self.mode = ‘stream’
- self.img_size = img_size
- self.stride = stride
- if os.path.isfile(sources):
- with open(sources, ‘r’) as f:
- sources = [x.strip() for x in f.read().strip().splitlines() if len(x.strip())]
- else:
- sources = [sources]
- n = len(sources)
- self.imgs = [None] * n
- self.sources = [clean_str(x) for x in sources] # clean source names for later
- for i, s in enumerate(sources):
- # Start the thread to read frames from the video stream
- print(f‘{i + 1}/{n}: {s}… ‘, end=”)
- cap = cv2.VideoCapture(eval(s) if s.isnumeric() else s)
- assert cap.isOpened(), f‘Failed to open {s}’
- w = int(cap.get(cv2.CAP_PROP_FRAME_WIDTH))
- h = int(cap.get(cv2.CAP_PROP_FRAME_HEIGHT))
- fps = cap.get(cv2.CAP_PROP_FPS) % 100
- _, self.imgs[i] = cap.read() # guarantee first frame
- thread = Thread(target=self.update, args=([i, cap]), daemon=True)
- print(f‘ success ({w}x{h} at {fps:.2f} FPS).’)
- thread.start()
- print(”) # newline
- # check for common shapes
- s = np.stack([letterbox(x, self.img_size, stride=self.stride)[0].shape for x in self.imgs], 0) # shapes
- self.rect = np.unique(s, axis=0).shape[0] == 1 # rect inference if all shapes equal
- if not self.rect:
- print(‘WARNING: Different stream shapes detected. For optimal performance supply similarly-shaped streams.’)
- def update(self, index, cap):
- # Read next stream frame in a daemon thread
- n = 0
- while cap.isOpened():
- n += 1
- # _, self.imgs[index] = cap.read()
- cap.grab()
- if n == 4: # read every 4th frame
- success, im = cap.retrieve()
- self.imgs[index] = im if success else self.imgs[index] * 0
- n = 0
- time.sleep(0.01) # wait time
- def __iter__(self):
- self.count = –1
- return self
- def __next__(self):
- self.count += 1
- img0 = self.imgs.copy()
- if cv2.waitKey(1) == ord(‘q’): # q to quit
- cv2.destroyAllWindows()
- raise StopIteration
- # Letterbox
- img = [letterbox(x, self.img_size, auto=self.rect, stride=self.stride)[0] for x in img0]
- # Stack
- img = np.stack(img, 0)
- # Convert
- img = img[:, :, :, ::-1].transpose(0, 3, 1, 2) # BGR to RGB, to bsx3x416x416
- img = np.ascontiguousarray(img)
- return self.sources, img, img0, None
- def __len__(self):
- return 0 # 1E12 frames = 32 streams at 30 FPS for 30 years
2.模型封装
接下来,我们借助detect.py文件对yolov5模型进行接口封装,使其提供模型推理能力。新建一个yolov5.py文件,构建一个名为darknet的类,使用函数detect,提供目标检测能力。其代码如下:
- # coding:utf-8
- import cv2
- import json
- import time
- import torch
- import numpy as np
- from camera import LoadStreams, LoadImages
- from utils.torch_utils import select_device
- from models.experimental import attempt_load
- from utils.general import non_max_suppression, scale_coords, letterbox, check_imshow
- class Darknet(object):
- “””docstring for Darknet”””
- def __init__(self, opt):
- self.opt = opt
- self.device = select_device(self.opt[“device”])
- self.half = self.device.type != ‘cpu’ # half precision only supported on CUDA
- self.model = attempt_load(self.opt[“weights”], map_location=self.device)
- self.stride = int(self.model.stride.max())
- self.model.to(self.device).eval()
- self.names = self.model.module.names if hasattr(self.model, ‘module’) else self.model.names
- if self.half: self.model.half()
- self.source = self.opt[“source”]
- self.webcam = self.source.isnumeric() or self.source.endswith(‘.txt’) or self.source.lower().startswith(
- (‘rtsp://’, ‘rtmp://’, ‘http://’))
- def preprocess(self, img):
- img = np.ascontiguousarray(img)
- img = torch.from_numpy(img).to(self.device)
- img = img.half() if self.half else img.float() # uint8 to fp16/32
- img /= 255.0 # 图像归一化
- if img.ndimension() == 3:
- img = img.unsqueeze(0)
- return img
- def detect(self, dataset):
- view_img = check_imshow()
- t0 = time.time()
- for path, img, img0s, vid_cap in dataset:
- img = self.preprocess(img)
- t1 = time.time()
- pred = self.model(img, augment=self.opt[“augment”])[0] # 0.22s
- pred = pred.float()
- pred = non_max_suppression(pred, self.opt[“conf_thres”], self.opt[“iou_thres”])
- t2 = time.time()
- pred_boxes = []
- for i, det in enumerate(pred):
- if self.webcam: # batch_size >= 1
- p, s, im0, frame = path[i], ‘%g: ‘ % i, img0s[i].copy(), dataset.count
- else:
- p, s, im0, frame = path, ”, img0s, getattr(dataset, ‘frame’, 0)
- s += ‘%gx%g ‘ % img.shape[2:] # print string
- gn = torch.tensor(im0.shape)[[1, 0, 1, 0]] # normalization gain whwh
- if det is not None and len(det):
- det[:, :4] = scale_coords(
- img.shape[2:], det[:, :4], im0.shape).round()
- # Print results
- for c in det[:, –1].unique():
- n = (det[:, –1] == c).sum() # detections per class
- s += f“{n} {self.names[int(c)]}{‘s’ * (n > 1)}, “ # add to string
- for *xyxy, conf, cls_id in det:
- lbl = self.names[int(cls_id)]
- xyxy = torch.tensor(xyxy).view(1, 4).view(-1).tolist()
- score = round(conf.tolist(), 3)
- label = “{}: {}”.format(lbl, score)
- x1, y1, x2, y2 = int(xyxy[0]), int(xyxy[1]), int(xyxy[2]), int(xyxy[3])
- pred_boxes.append((x1, y1, x2, y2, lbl, score))
- if view_img:
- self.plot_one_box(xyxy, im0, color=(255, 0, 0), label=label)
- # Print time (inference + NMS)
- # print(pred_boxes)
- print(f‘{s}Done. ({t2 – t1:.3f}s)’)
- if view_img:
- print(str(p))
- cv2.imshow(str(p), cv2.resize(im0, (800, 600)))
- if self.webcam:
- if cv2.waitKey(1) & 0xFF == ord(‘q’): break
- else:
- cv2.waitKey(0)
- print(f‘Done. ({time.time() – t0:.3f}s)’)
- # print(‘[INFO] Inference time: {:.2f}s’.format(t3-t2))
- # return pred_boxes
- # Plotting functions
- def plot_one_box(self, x, img, color=None, label=None, line_thickness=None):
- # Plots one bounding box on image img
- tl = line_thickness or round(0.001 * max(img.shape[0:2])) + 1 # line thickness
- color = color or [random.randint(0, 255) for _ in range(3)]
- c1, c2 = (int(x[0]), int(x[1])), (int(x[2]), int(x[3]))
- cv2.rectangle(img, c1, c2, color, thickness=tl)
- if label:
- tf = max(tl – 1, 1) # font thickness
- t_size = cv2.getTextSize(label, 0, fontScale=tl / 3, thickness=tf)[0]
- c2 = c1[0] + t_size[0], c1[1] – t_size[1] – 3
- cv2.rectangle(img, c1, c2, color, –1) # filled
- cv2.putText(img, label, (c1[0], c1[1] – 2), 0, tl / 3, [0, 0, 0], thickness=tf, lineType=cv2.LINE_AA)
- if __name__ == “__main__”:
- with open(‘yolov5_config.json’, ‘r’, encoding=‘utf8’) as fp:
- opt = json.load(fp)
- print(‘[INFO] YOLOv5 Config:’, opt)
- darknet = Darknet(opt)
- if darknet.webcam:
- # cudnn.benchmark = True # set True to speed up constant image size inference
- dataset = LoadStreams(darknet.source, img_size=opt[“imgsz”], stride=darknet.stride)
- else:
- dataset = LoadImages(darknet.source, img_size=opt[“imgsz”], stride=darknet.stride)
- darknet.detect(dataset)
- cv2.destroyAllWindows()
此外,还需要提供一个模型配置文件,我们使用json文件进行保存。新建一个yolov5_config.json文件,内容如下:
- {
- “source”: “streams.txt”, # 为视频图像文件地址
- “weights”: “runs/train/exp/weights/best.pt”, # 自己的模型地址
- “device”: “cpu”, # 使用的device类别,如是GPU,可填”0″
- “imgsz”: 640, # 输入图像的大小
- “stride”: 32, # 步长
- “conf_thres”: 0.35, # 置信值阈值
- “iou_thres”: 0.45, # iou阈值
- “augment”: false # 是否使用图像增强
- }
视频图像文件可以是单独的一张图像,如:”…/images/demo.jpg”,也可以是一个视频文件,如:”…/videos/demo.mp4″,也可以是一个视频流地址,如:“rtsp://wowzaec2demo.streamlock.net/vod/mp4:BigBuckBunny_115k.mov”,还可以是一个txt文件,里面包含多个视频流地址,如:
- rtsp://wowzaec2demo.streamlock.net/vod/mp4:BigBuckBunny_115k.mov
- rtsp://wowzaec2demo.streamlock.net/vod/mp4:BigBuckBunny_115k.mov
– 有了如此配置信息,通过运行yolov5.py代码,我们能实现对视频文件(mp4、avi等)、视频流地址(http、rtsp、rtmp等)、图片(jpg、png)等视频图像文件进行目标检测推理的效果。
3.Flask后端处理
有了对模型封装的代码,我们就可以利用flask框架实时向前端推送算法处理之后的图像了。新建一个web_main.py文件:
- # import the necessary packages
- from yolov5 import Darknet
- from camera import LoadStreams, LoadImages
- from utils.general import non_max_suppression, scale_coords, letterbox, check_imshow
- from flask import Response
- from flask import Flask
- from flask import render_template
- import time
- import torch
- import json
- import cv2
- import os
- # initialize a flask object
- app = Flask(__name__)
- # initialize the video stream and allow the camera sensor to warmup
- with open(‘yolov5_config.json’, ‘r’, encoding=‘utf8’) as fp:
- opt = json.load(fp)
- print(‘[INFO] YOLOv5 Config:’, opt)
- darknet = Darknet(opt)
- if darknet.webcam:
- # cudnn.benchmark = True # set True to speed up constant image size inference
- dataset = LoadStreams(darknet.source, img_size=opt[“imgsz”], stride=darknet.stride)
- else:
- dataset = LoadImages(darknet.source, img_size=opt[“imgsz”], stride=darknet.stride)
- time.sleep(2.0)
- @app.route(“/”)
- def index():
- # return the rendered template
- return render_template(“index.html”)
- def detect_gen(dataset, feed_type):
- view_img = check_imshow()
- t0 = time.time()
- for path, img, img0s, vid_cap in dataset:
- img = darknet.preprocess(img)
- t1 = time.time()
- pred = darknet.model(img, augment=darknet.opt[“augment”])[0] # 0.22s
- pred = pred.float()
- pred = non_max_suppression(pred, darknet.opt[“conf_thres”], darknet.opt[“iou_thres”])
- t2 = time.time()
- pred_boxes = []
- for i, det in enumerate(pred):
- if darknet.webcam: # batch_size >= 1
- feed_type_curr, p, s, im0, frame = “Camera_%s” % str(i), path[i], ‘%g: ‘ % i, img0s[i].copy(), dataset.count
- else:
- feed_type_curr, p, s, im0, frame = “Camera”, path, ”, img0s, getattr(dataset, ‘frame’, 0)
- s += ‘%gx%g ‘ % img.shape[2:] # print string
- gn = torch.tensor(im0.shape)[[1, 0, 1, 0]] # normalization gain whwh
- if det is not None and len(det):
- det[:, :4] = scale_coords(
- img.shape[2:], det[:, :4], im0.shape).round()
- # Print results
- for c in det[:, –1].unique():
- n = (det[:, –1] == c).sum() # detections per class
- s += f“{n} {darknet.names[int(c)]}{‘s’ * (n > 1)}, “ # add to string
- for *xyxy, conf, cls_id in det:
- lbl = darknet.names[int(cls_id)]
- xyxy = torch.tensor(xyxy).view(1, 4).view(-1).tolist()
- score = round(conf.tolist(), 3)
- label = “{}: {}”.format(lbl, score)
- x1, y1, x2, y2 = int(xyxy[0]), int(xyxy[1]), int(xyxy[2]), int(xyxy[3])
- pred_boxes.append((x1, y1, x2, y2, lbl, score))
- if view_img:
- darknet.plot_one_box(xyxy, im0, color=(255, 0, 0), label=label)
- # Print time (inference + NMS)
- # print(pred_boxes)
- print(f‘{s}Done. ({t2 – t1:.3f}s)’)
- if feed_type_curr == feed_type:
- frame = cv2.imencode(‘.jpg’, im0)[1].tobytes()
- yield (b‘–frame\r\n’ b‘Content-Type: image/jpeg\r\n\r\n’ + frame + b‘\r\n’)
- @app.route(‘/video_feed/<feed_type>’)
- def video_feed(feed_type):
- “””Video streaming route. Put this in the src attribute of an img tag.”””
- if feed_type == ‘Camera_0’:
- return Response(detect_gen(dataset=dataset, feed_type=feed_type),
- mimetype=‘multipart/x-mixed-replace; boundary=frame’)
- elif feed_type == ‘Camera_1’:
- return Response(detect_gen(dataset=dataset, feed_type=feed_type),
- mimetype=‘multipart/x-mixed-replace; boundary=frame’)
- if __name__ == ‘__main__’:
- app.run(host=‘0.0.0.0’, port=“5000”, threaded=True)
通过detect_gen函数将多个视频流地址推理后的图像按照feed_type类型,通过video_feed视频流路由进行传送到前端。
4.前端展示
最后,我们写一个简单的前端代码。首先新建一个templates文件夹,再在此文件夹中新建一个index.html文件,将下面h5代码写入其中:
- <html>
- <head>
- <style>
- * {
- box–sizing: border–box;
- text–align: center;
- }
- .img–container {
- float: left;
- width: 30%;
- padding: 5px;
- }
- .clearfix::after {
- content: “”;
- clear: both;
- display: table;
- }
- .clearfix{
- margin–left: 500px;
- }
- </style>
- </head>
- <body>
- <h1>Multi-camera with YOLOv5</h1>
- <div class=“clearfix”>
- <div class=“img-container” align=“center”>
- <p align=“center”>Live stream 1</p>
- <img src=“{{ url_for(‘video_feed’, feed_type=’Camera_0′) }}” class=“center” style=“border:1px solid black;width:100%“ alt=“Live Stream 1”>
- </div>
- <div class=“img-container” align=“center”>
- <p align=“center”>Live stream 2</p>
- <img src=“{{ url_for(‘video_feed’, feed_type=’Camera_1′) }}” class=“center” style=“border:1px solid black;width:100%“ alt=“Live Stream 2”>
- </div>
- </div>
- </body>
- </html>
至此,我们利用YOLOv5模型实现多路摄像头实时推理代码就写完了,下面我们开始运行:
– 在终端中进行跟目录下,直接运行:
- python web_main.py
然后,会在终端中出现如下信息:
- [INFO] YOLOv5 Config: {‘source’: ‘streams.txt’, ‘weights’: ‘runs/train/exp/weights/best.pt’, ‘device’: ‘cpu’, ‘imgsz’: 640, ‘stride’: 32, ‘conf_thres’: 0.35, ‘iou_thres’: 0.45, ‘augment’: False}
- Fusing layers…
- 1/2: rtsp://wowzaec2demo.streamlock.net/vod/mp4:BigBuckBunny_115k.mov… success (240×160 at 24.00 FPS).
- 2/2: rtsp://wowzaec2demo.streamlock.net/vod/mp4:BigBuckBunny_115k.mov… success (240×160 at 24.00 FPS).
- * Serving Flask app “web_main” (lazy loading)
- * Environment: production
- WARNING: This is a development server. Do not use it in a production deployment.
- Use a production WSGI server instead.
- * Debug mode: off
- * Running on http://0.0.0.0:5000/ (Press CTRL+C to quit)
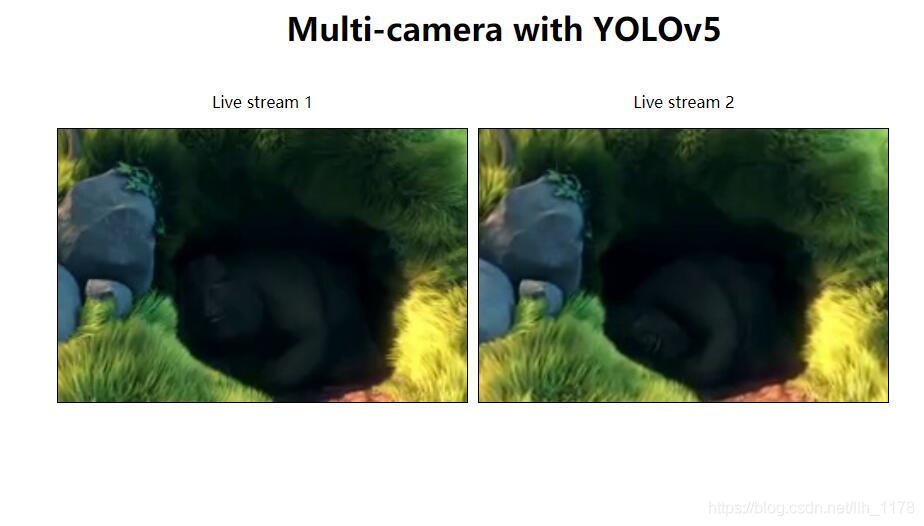
* 接着打开浏览器,输入localhost:5000后,终端没有报任何错误,则就会出现如下页面:
总结
1. 由于没有额外的视频流rtmp/rtsp文件地址,所以就找了一个公开的视频流地址,但是没有办法看到检测效果;
2. 部署的时候,只能使用视频流地址进行推理,且可以为多个视频流地址,保存为stream.txt,用yolov5_config.json导入;
3. 此demo版本为简易版的端到端模型部署方案,还可以根据场景需要添加更多功能。
到此这篇关于用YOLOv5实现多路摄像头实时目标检测功能的文章就介绍到这了,更多相关YOLOv5多路摄像头实时目标检测内容请搜索我们以前的文章或继续浏览下面的相关文章希望大家以后多多支持我们!